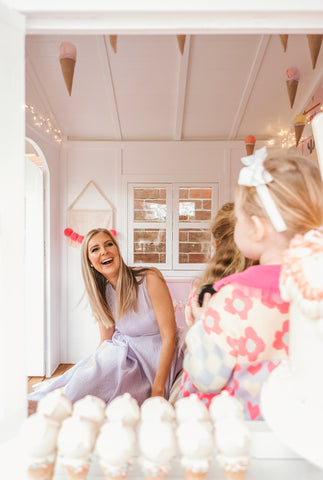
Lorinska’s Palm Springs Inspired Cubby by Minnie and Me Interiors
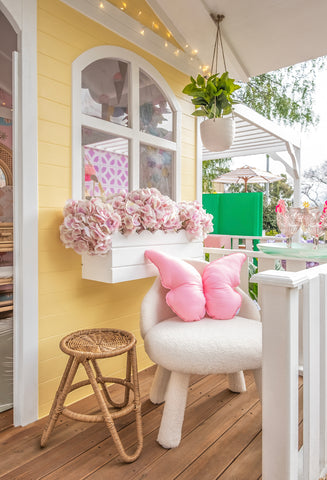
We teamed up with Lorinska, Hide and Seek Kids for another EPIC cubby project. This is honestly our best one yet! Here we’ll walk you through step by step how we brought this beauty to life.

Step 1 THE CUBBY and ACCESSORIES:
For this project we chose the following goodies from our friends at Hide and Seek Kids:
- The Billie Grand Cubby with pergola add on, shelves and chimney
- Plus the new scalloped front and cottage flower box
- Table and bench seats with umbrella and cushions
- Mud kitchen with blackboard (blackboard not shown in images below)
Step 2 DESIGN:
Lorinska left the design to me, so I hit Pinterest for inspo. I’ve always wanted to do a yellow cubby, so my first search was “Yellow Homes”, which turned up two gorgeous inspo images, a yellow house with white trims, and a yellow house with a hot pink door… perfect, as pink is Lorinska’s fave colour. Next, I decided on a Palm Springs theme, and found my perfect inspo images which included a yellow, pink and green colour palette. I searched “Palm Springs” and “Palm Springs Interiors” and “Things to do in Palm Springs”. I took it one step further, choosing to further narrow down my theme, I decided on a Palm Springs Ice Shoppe. My searches then included “Ice cream Shop” and “Palm Springs Ice cream Shop”.

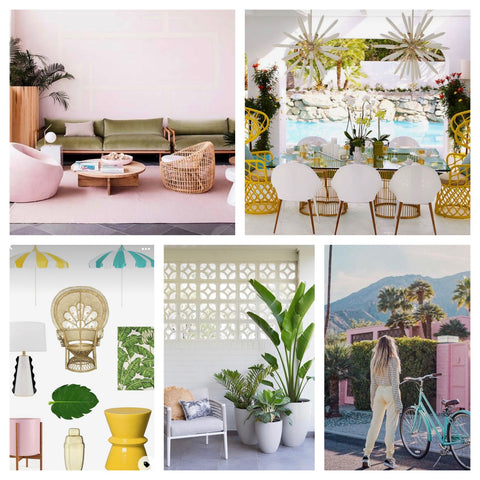

📷 Images all via Pinterest
Tips:
1/ decide on your cubby colour palette then search Pinterest for inspo. Do the same for your chosen theme. Use lots of key words like I did to narrow the search.
2/ Choose images that make your heart sing, and make a collage/ mood board using the Pic Collage App - so quick and easy.
Step 3 PAINTING and CONSTRUCTION:
Hide and Seek Kids provide well detailed and easy to follow instructions for building the base and painting the cubby. Read here:
https://www.hideandseekkids.com.au/painting-maintenance-information/
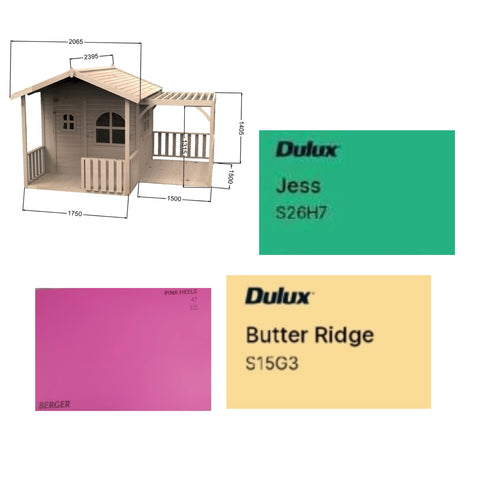
Paint colours - Based on my inspo images, my painter and I selected:
1/ Butter Ridge by Dulux for the main body of the cubby
2/ Pink Heels by Berger for the front door (dulux paint)
3/ Jess by Dulux for the mud kitchen
4/ Gloss white for the roof and trims
5/ Merbau Stain for the flooring and table
 Tips:
Tips:
1/ Always follow the painting and maintenance info on the Hide and Seek Kids website to ensure longevity of your cubby.
2/ Get yourself some sample pots and test your paint colours outside, as light changes the look of the colours, you want your colours to be vibrant.
Step 4 PAINTING and CONSTRUCTION:
My brother, Jon installed the wallpaper inside the cubby. Here’s a quick tutorial:
1/ measure your cubby wall and cut the corflute to size. Purchase corflute at your local hardware store.
2/ you will likely have to apply the corflute in two pieces, depending on the size of your corflute sheets and cubby… join the corflute pieces with a thin tape, you want the surface to be as smooth as possible. Attach the corflute to your cubby with a heavy duty double sided tape. Give the corflute a wipe over with a lint free, dry cloth.
3/ install the wallpaper - peel, stick, smooth and trim. Instructions here:
https://www.minnieandmeinteriors.com/pages/wallpaper-installation
Watch our cubby wallpaper install videos on insta here:
https://www.instagram.com/reel/Ce0ZUvZL9aA/?igshid=YmMyMTA2M2Y=
https://www.instagram.com/reel/COPxlYTHoXf/?igshid=YmMyMTA2M2Y=
https://www.instagram.com/tv/CaamgM1BM1w/?igshid=YmMyMTA2M2Y=
For the outdoor breeze block wallpaper, Annette from Hide and Seek Kids recommends screwing perspex to the back of the pergola to apply your wallpaper to. Before attaching it to the cubby, apply the wallpaper to the perspex then screw the perspex to the cubby. Our wallpaper can be used outdoors, but as with anything exposed to the elements, it will weather over time.
Tip:
Inside the cubby, we like to wallpaper above and below the white beam, it looks like a picture rail, and it is actually easier to wallpaper this way because you can install the wallpaper top to bottom. For the top section, cut the corflute in the shape of a triangle, as per the cubby measurements, apply the wallpaper, then attach it to the cubby in the same way as the larger main section.
If you’d prefer, you can cover the whole wall up to the pitch with corflute and wallpaper… just measure the space, and cut the corflute in the shape of a house as per your cubby measurements, then install the wallpaper from the bottom up.
STEP 5 STYLING:
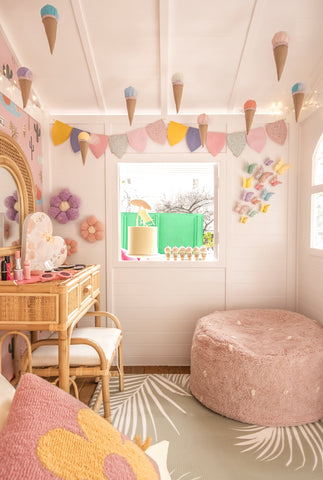
I worked with my fave insta small businesses on the furniture and decor items. I created another vision board featuring all of the decorator items to ensure the vibe and colour palette was cohesive.

I wanted to create a fun party vibe, so the following elements were important:
1/ a vanity and make up for glamming up before the party!
2/ a squishy play mat, ample seating and cushions for comfortable play.
3/ ice cream decor to bring the ice cream shoppe to life.
4/ a mud kitchen is a must in a cubby, it allows for lots of imaginative and messy play.
5/ cakes and decorations, no faux in the this cubby! The shoot was a true garden party! Adding a picnic table allows for fun family lunches and dinners outdoors.
6/ flowers, greenery and pots brought the whole look together.
7/ fairy lights added warmth and magic.
8/ cactus brass knobs were purchased on Etsy to fit with the theme. It’s all in the details!
Tip:
Be playful and have fun with your styling! There are no rules!
We hope you love this project as much as we loved putting it together. We welcome your feedback.

CREDITS AND THANKS:
A special thanks to Lorinska @lorinska and her beautiful girls, Penelope and Florence for trusting us to bring their beautiful play space life.
Cubby styling: Kristy Young, Minnie and Me Interiors @minnieandmeinteriors
Dessert table styling: Kiki Party Studio @kikipartystudio
Wallpaper install: Nagambie Signs and Graphics @nagambie_signs_and_graphics
Photography: Raffaela Jenkins @raffaela.sofia
Videography: Alisha Marfatia @thesocialimpact.co
Styling Support Team: Annette from Hide and Seek Kids, Steph from Minnie and Me Interiors, Tegan from @tegan_jean #legends



Product list:
1/ Softly Summer
Padded play mat and daydreamer pillow mat
2/ Hunter + Nomad
Pink dot ottoman (60x30cm)
3/ Funsquare
Pink play seat set
4/ Marla+Co
Personalised wall flag, mini tassel chandeliers, floor cushions
5/ Mimo Pots
x6 pots in various sizes and colours and faux flowers and plants
6/ Little Makeup Lovers
Kids pretend play makeup
https://littlemakeuplovers.com.au
7/ Livly
Luna Pop Maree Light in collaboration with Minnie and Me Interiors
https://livly.com.au/products/luna-pop-maree-light-made-to-order
8/ The Bahan Collective
Pom pom wall daisies and retro daisy cushion cover
https://thebahancollective.com
9/ Cowrie and Conch
Milkmaid chair and mirror
https://www.cowrieandconch.com.au
10/ Little Custom Creations
Sorbet hanging creams, butterfly cushions, butterfly wall decals and bunting
https://littlecustomcreations.com
11/ Kiki Party Studio
Customised acrylic party decorations
https://www.kikipartystudio.com
12/ Meno Zero gelato and dessert bar
Meno custom cakes, mini custard cannoli, mini red velvet tarts and mini lemon meringue tarts
13/ The Pop-Up Party Co
Lollipop DIY balloon garland kit in 5m upsize
https://thepopuppartyco.com.au
14/ Poppy’s Little Treasures
Nani dresser
https://www.poppyslittletreasures.com/products/pre-order?_pos=2&_sid=8d1f40b6d&_ss=r
15/ Hide and Seek Kids
And last but not least, the star of the show, the Billie Cubby and accessories
https://www.hideandseekkids.com.au/billie-grand-cubby-house
https://www.hideandseekkids.com.au/pergola-addon
https://www.hideandseekkids.com.au/mud-kitchen-with-blackboard
https://www.hideandseekkids.com.au/kids-table-bench-set-with-umbrella

